This post is mainly a reminder on how to do this, as I don't use Laravel frequently-enough for it to become second nature.
The full setup instructions for setting up Homestead are at laravel.com/docs/5.2/homestead, so complete them whilst referring here.
Some other notes:
- I'll use a hypothetical site "mysite.dev" to give some context to the steps
- I will place the files in the VM in "sites/" and not "Code/", which frankly, is a silly default
- There is a mixture of Windows and Mac info in this post, but I don't specifically refer to it; you should be able to figure it out
- You will need to have some basic knowledge of things such as SSH, and the setup required for your OS to make that happen
1 – Add your new site to the Homestead.yaml file
This is the core information needed to set up the VM so that your virtual site will run from your physical files.
It's also the bit that most people (myself included) get wrong when setting up the VM for the first time, or coming back to it after a break because it looks obvious – but there are subtle nuances with the folder mappings that can be easy to get wrong – so make sure you properly read the following and understand it before continuing!
It essentially covers mappings between:
- The physical folder location of your files
- The virtual folder copy location of your files
- The domain / URL of the site
The relationships are easier-visualised with a diagram:
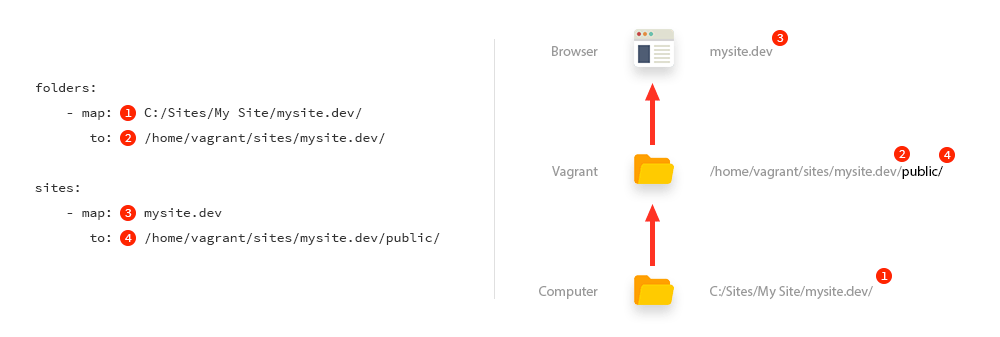
The vagrant file has two root nodes called folders and sites that you'll use to make your physical files available to the VM and the browser.
Each site will require two sets of mappings in the yaml file:
folders:
    - map: (1) PROJECT     - the physical location of your project's website files on your computer's hard disk
       to: (2) SITE        - the virtual location inside the virtual machine that will mirror these files
                             Typically, this goes as follows: VAGRANT_FOLDER/SITE_FOLDER/PROJECT_DOMAIN (3)
                             This is also the folder you will SSH into and navigate around, seeing a verbatim copy of your project folder's (1) files

sites:
    - map: (3) DOMAIN      - the URL you will access your site on, and the identifier Vagrant will use to provision your site
       to: (4) PUBLIC      - the public folder of the site folder (2) inside the virtual machine
Edit the %USERPROFILE%/.homestead/Homestead.yaml file and enter the correct values for your site, making sure not to take anything for granted and stick in the wrong values by mistake:
folders:
    - map: C:/Projects/My Site/mysite.dev
      to: /home/vagrant/sites/mysite.dev

sites:
    - map: mysite.dev
      to: /home/vagrant/sites/mysite.dev/public
Again: note that I'm calling the sites folder "/sites/" whereas the default Homestead installation will refer to it as "/Code/". Vagrant / Homestead doesn't care what you call it, as long as it can map a URL > VM folder > physical folder.
Also, note that in theory you could get away with a single folder mapping if you symlink each of your physical sites to a central folder, then map only that folder:
folders:
    - map: C:/Sites/
      to: /home/vagrant/sites/
2 – "Provision" the site
This is a slightly esoteric term which results in the creation of the configuration files nginx will use to run the site.
This is done using the command line, from the "Homestead" directory, which if you followed the Laravel guide is in your User folder:
cd ~/Homestead
vagrant up --provision
Once the VM is up, from the same folder, SSH into it:
vagrant ssh
The newly-created configuration files can be found inside the VM (the info is pulled from your Homestead.yaml file you just edited) at:
/etc/nginx/sites-available/mysite.dev
Use nano to view the contents:
cd /etc/nginx/sites-available
sudo nano mysite.dev
There is also a sites-enabled/ folder, which just contains symbolic links to the sites-available/ folder, for all enabled sites. Editing any files in here will effectively edit the original files.
Without these files existing, your site won't load. If there is an error, or badly-referenced path in here, nginx won't start. More (Mac-flavoured info) here: laravel.com/docs/master/homestead
You can get back to the folder your site is hosted in (#2 in the config above) as follows:
cd /home/vagrant/sites/mysite.dev
3 – Configure your hosts file
To run the site in the browser using its domain, you have to map the the domain to the IP of Homestead.
Edit your hosts file…
C:\Windows\System32\drivers\etc\hosts
… and add the project:
192.168.10.10 mysite.dev
At this point, test the site in the browser and it should run:
http://mysite.dev:8000If not, for example you've moved the site files to a new location or such like…
4 – Make sure nginx is running
Nginx is the web server inside the VM that serves your site. If it's not working (perhaps due to a badly-configured config file) your site won't load, or nginx won't even start.
I've only found this out through trial and error and asking questions on the laravel Slack channel (which I recommend everyone join to get really high-quality help).
In your VM, try restarting nginx by typing:
nginx -s restart
If that fails, test the configuration using:
nginx -t
Check any errors that are thrown (they are quite descriptive, and will tell you the file and line number the error is on – which could be wrong paths, accidentally-typed characters, etc) and fix them if needs be, then restart nginx using:
nginx -s start #may just be nginx, I can't remember!
More info here: nginx.com/resources/wiki/start/topics/tutorials/commandline/
5 – Make sure your (Windows) SSH console setup good enough
Lastly, the SSH experience on Windows is SHIT. Unless you have your own setup sorted, I recommend you check out my blog post on getting a setup that works.
You can find it here:
That's it!